Multi-text and multi-image frames are versatile building blocks used to capture data for personalization, power interactive quizzes, or a combination of both. These frames allow you to present multiple options to your audience in a clean, structured layout.
Overview
Step 3: Styling the Interaction
Step 4: Configuring Behavior (Options)
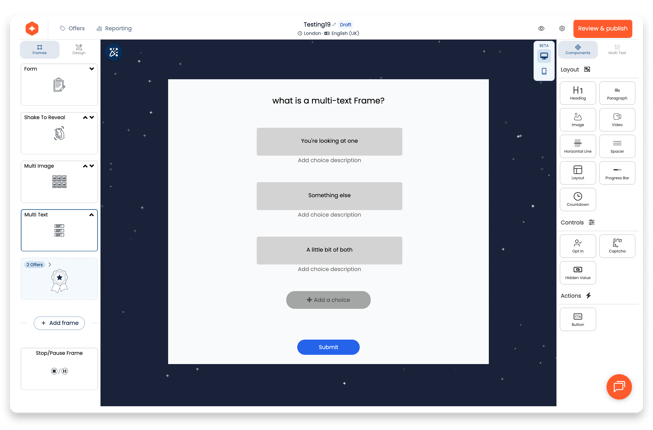
Step 1: Adding the Frame
To begin building your selection screen:
Create: Select the "+" icon from the left-hand navigation and choose either multi-text or multi-image.
Identify: The name you give your frame will automatically populate the header and serve as the field mapping ID for any submitted answers.
.png?width=630&height=415&name=Frame%201490%20(1).png)
Step 2: Creating Your Choices
Once your frame is added, you can populate it with as many options as your campaign requires.
- Adding Options: Click "+ Add a choice" to create a new selection.
- Text Choices: Simply type the answer you wish to make available.
- Image Choices: Upload a new image or select one from your gallery for each answer.
- Labels & Descriptions:
- Labels (Required for Images): For image-based answers, you must provide a label. This text is what is captured and stored in your reports when a customer selects that image.
- Descriptions (Optional): You can add descriptions to both text and image answers to provide more context, though these are not required.
Step 3: Styling the Interaction
The Style panel gives you granular control over how your choices look during different stages of the user journey.
- State-Based Formatting: Beyond standard text styling, you can independently edit the appearance of choices for three distinct states: Unselected, Selected, and Hover.
Layout & Geometry:
- Columns: Choose how many columns you’d like your options to be split into.
- Spacing: Adjust padding (px) and width (%) to fit your design .
- Roundness: Use the Corner Roundness slider to match the aesthetic of your other frames.
- Visual Effects: Customize the Fill color, Border, and Glow for your choice containers.
.png?width=621&height=409&name=Frame%201492%20(1).png)
Step 4: Configuring Behavior (Options)
Fine-tune how the frame reacts when a customer makes a selection:
- Auto Next Frame: Enable this to automatically move the user to the next stage of the experience the moment they select an answer.
- Allow Multi-Choice: Toggle this on if you want customers to be able to select more than one option. You can then define how many options they can choose.
- Show Descriptions: Choose whether or not to display any additional text descriptions you added in Step 2.